
Lunar Pro
Sync Mode
Synchronise the brightness of your built-in display to all your external monitors.
Description
If you have "Automatically adjust brightness" enabled in System Preferences, macOS will always adapt Apple displays to the ambient light around you using their internal light sensor.

Lunar can take advantage of that by observing the brightness of these displays and sending every change to the external monitors.
Source displays
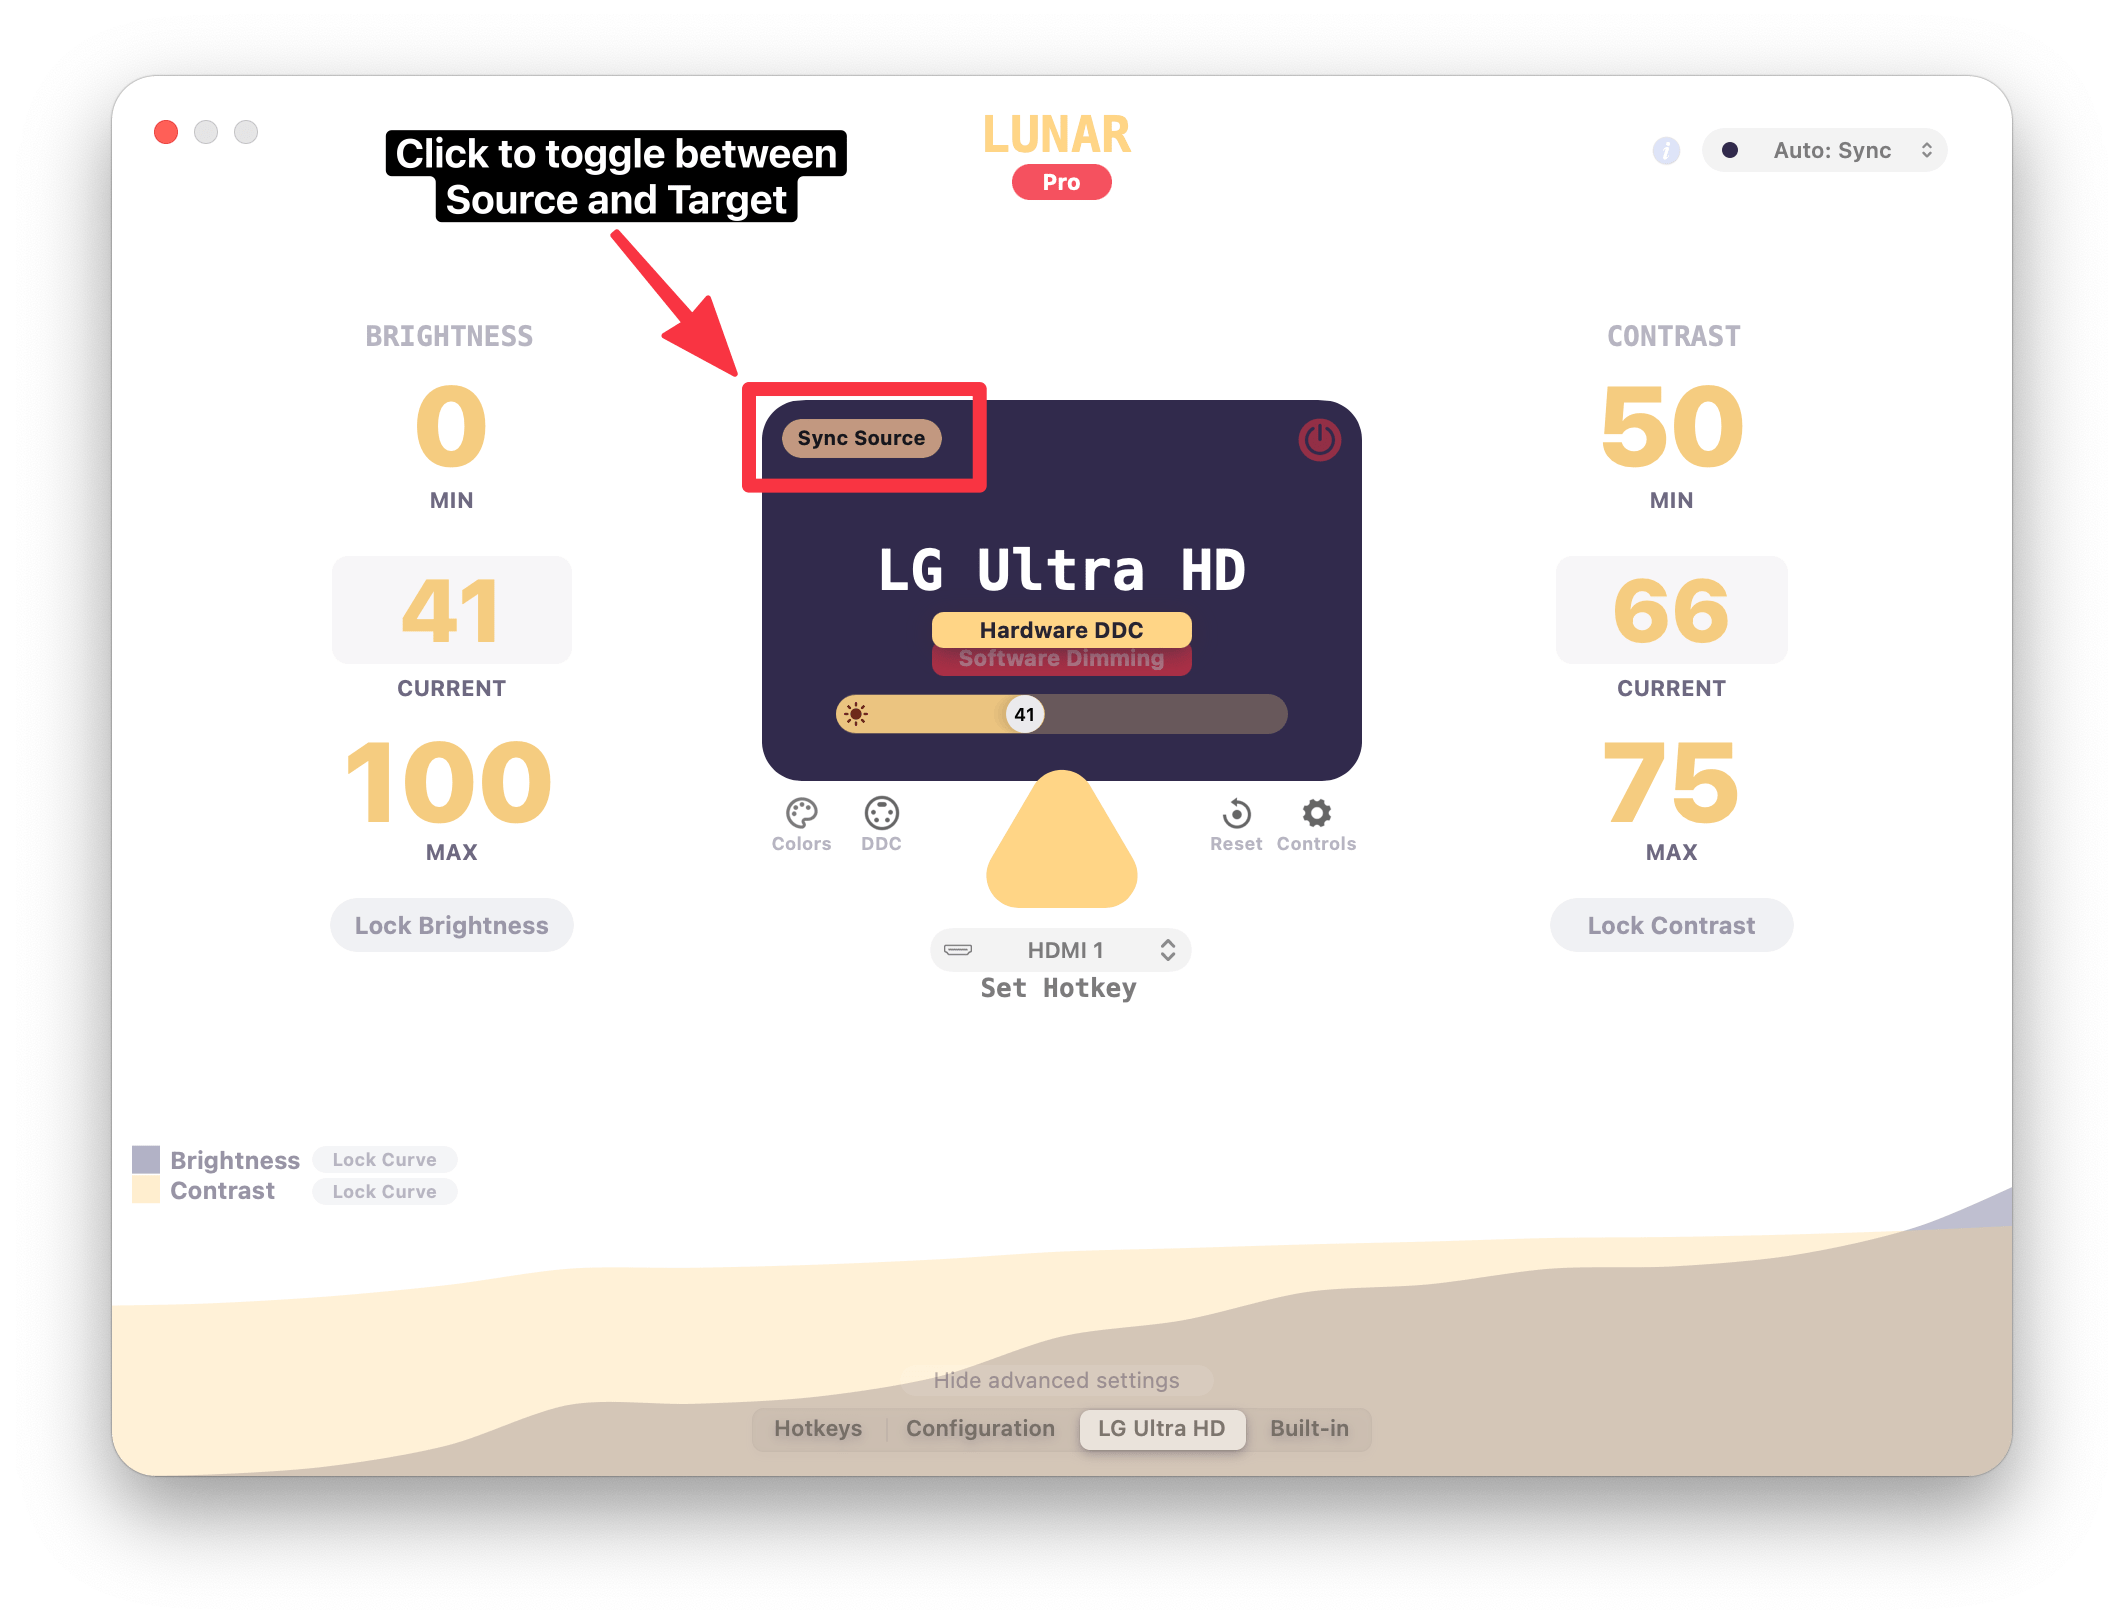
To use a monitor as a source, click on the Sync Target button on the display page to toggle it to Sync Source.
Brightness keys (and TouchBar)
Because Lunar is constantly listening for brightness changes, you may keep adjusting your source display using the brightness keys, TouchBar sliders or Control Center from the menu bar, and your external monitors will get those adjustments as well.
You can also adjust external monitors separately using Ctrl+Brightness Up/Down.
Curve algorithm for Sync Mode
When Lunar detects a brightness change, it doesn't send the brightness value of the internal display as it is. Instead the value is passed through an algorithm that is constantly adapting to your manual adjustments so that the perceived luminosity stays the same across all monitors.
This is needed because some monitors can look brighter than others with the same brightness value. For example the MacBook display has 500 nits of brightness which is very bright compared to other monitors, so 50% brightness on MacBook’s display may look noticeably brighter than 50% on your external monitors (which usually have around 300-400 nits).
Lunar can also learn from your personal light perception and readjust the curve whenever you manually change the brightness of an external monitor so that, over time, the brightness computed by Lunar will get closer and closer to what you need.
Configuring Sync Mode for multi-source setups
In setups where more than one Sync Source is available, you might need to manually choose the best source.
Some examples of multi-source setups:
- MacBook + Pro Display XDR
- Studio Display + LG Ultrafine
- Dual-monitor Pro Display XDR
Here's how to configure Lunar for these setups:
- Choose the right source based on the light sensor accuracy of the display
- If you use a MacBook, the built-in display is always the most responsive source
- Otherwise, prioritize Studio Display and Pro Display, followed by LG Ultrafine and the rest
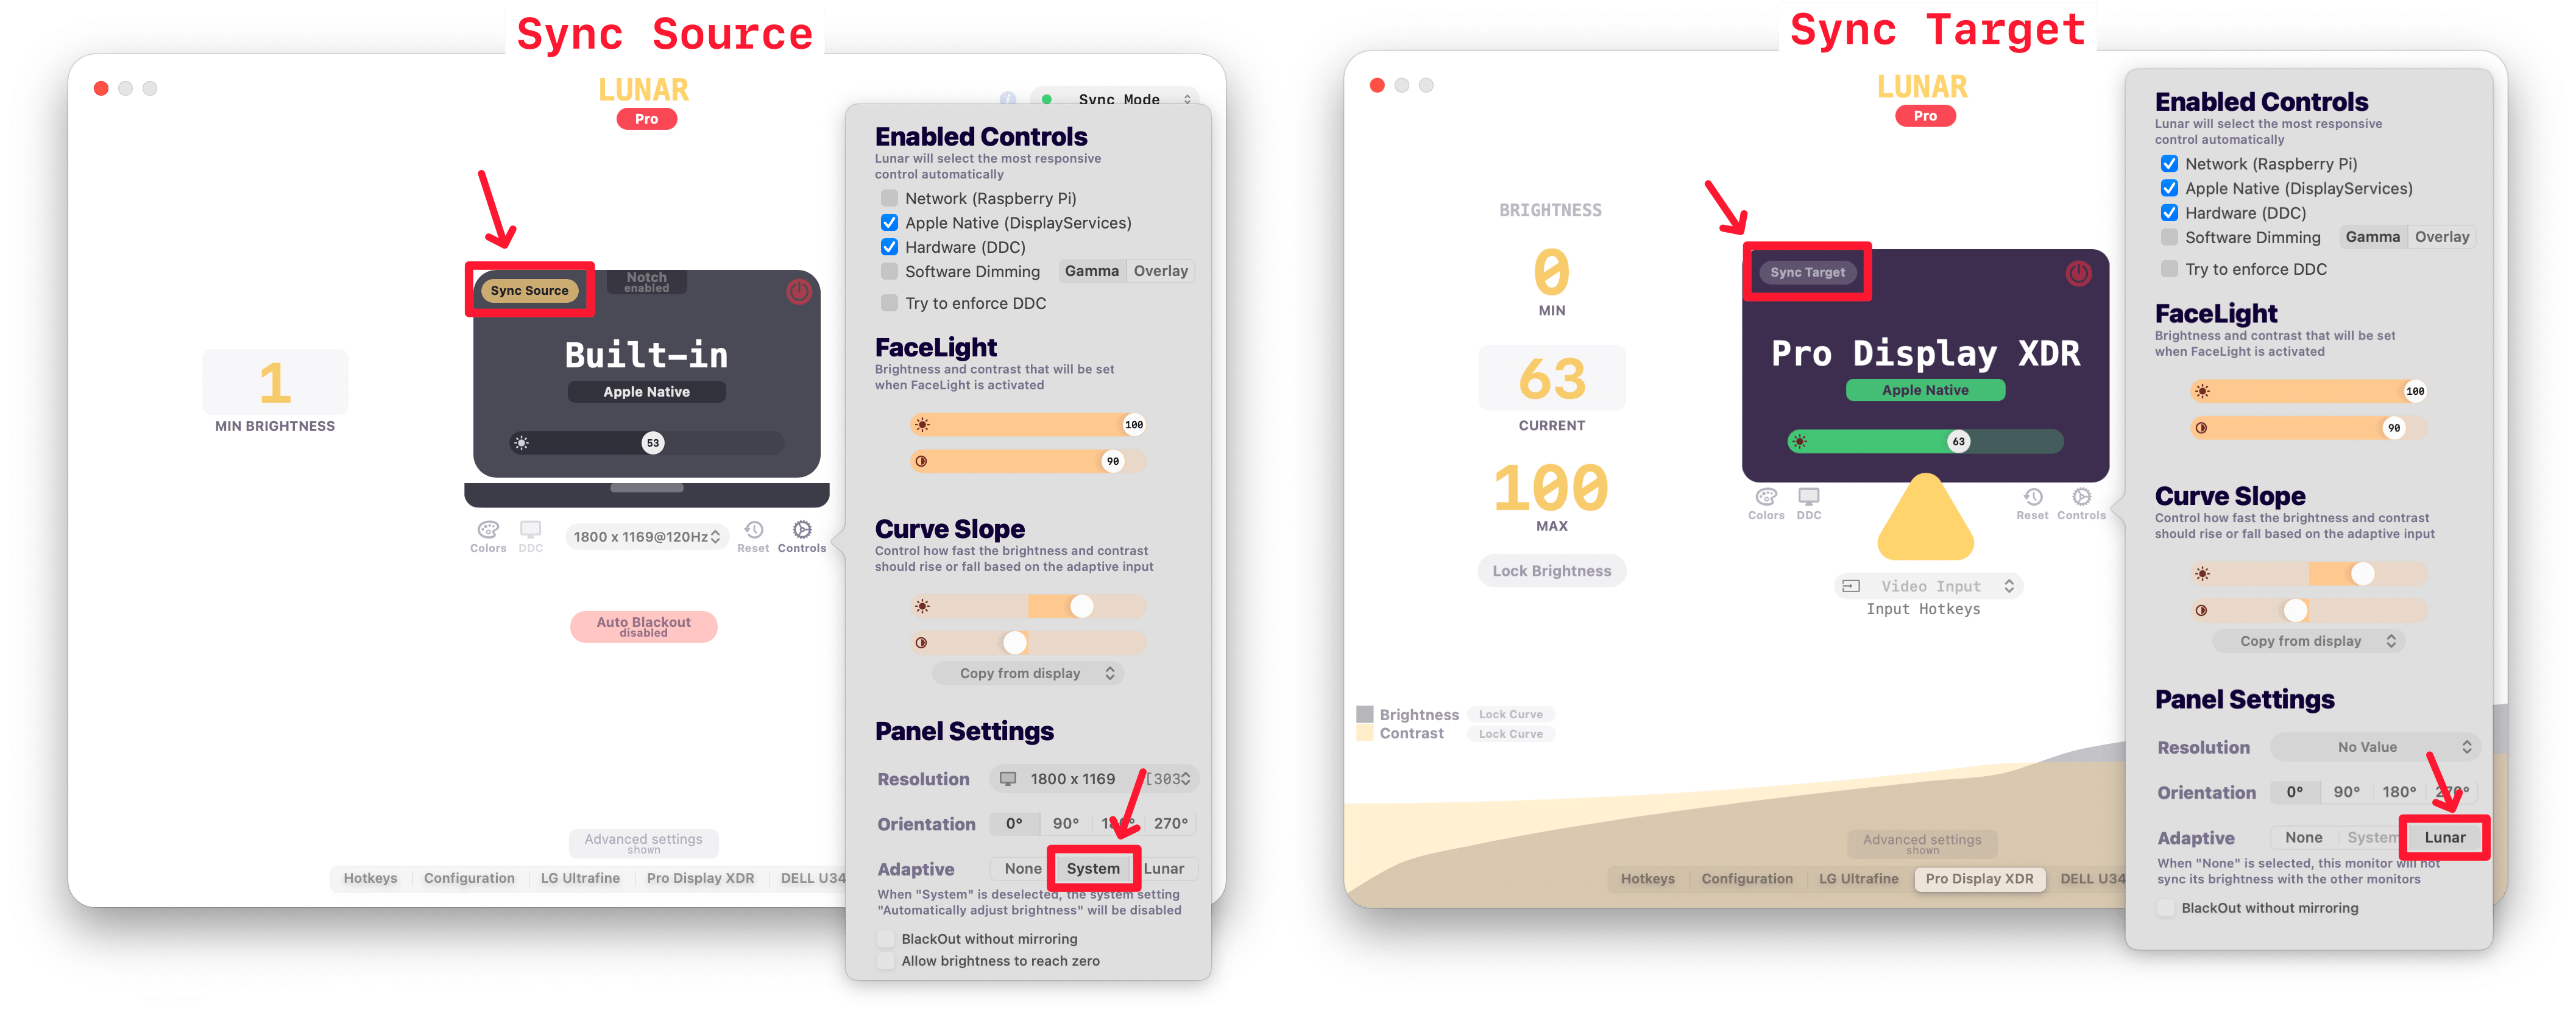
- Set the source as a Sync Source in Lunar
- Set the Adaptive setting to System for the source from the Controls menu
- Set the rest of the monitors as a Sync Target in Lunar
- Set the Adaptive setting to Lunar for all the targets from the Controls menu
- Follow the steps below for getting the brightness curves right for each monitor
Steps for keeping luminance in sync
- Reset the Algorithm curve on all displays from the Controls menu
- Whenever a target display feels darker/brighter than it should be, adjust it until it's back in sync with the source
- In multi-monitor setups you can move the cursor to that display and use
Shift+Brightness Up/Downto control it - You can also use the sliders to do this
- In multi-monitor setups you can move the cursor to that display and use
- Lunar will recompute the curve based on these manual adjustments so that it will be completely automatic after a few days
Location Mode
Adapt the brightness of your monitors based on the sun position in the sky.
If you use your monitors in a room with lots of natural light, Location Mode might be a good choice.
Location sources
Lunar will ask for Location Services permissions when you first launch it, and will fetch your last coordinates to compute the sun position throughout the day.
If Location Services permissions are not granted or if there are no valid coordinates, Lunar will try an IP Geolocation service like ipstack.com
If both methods fail, Location Mode will be unavailable as a choice.
Function
The way Location Mode works is pretty simple:
- When the sun is at its zenith (highest position in the sky, noon), Lunar will set all the monitors to their Max Brightness
- When the sun is below the horizon (between twilight and dusk), Lunar will set all the monitors to their Min Brightness
- Anything in between is passed through the Curve Algorithm to compute a fitting brightness for each monitor
Curve Algorithm for Location Mode
This is the algorithm that converts the sun position (in degrees relative to horizon) to a brightness value specific to each monitor.
Lunar can learn from your personal light perception and readjust the curve whenever you manually change the brightness of an external monitor so that, over time, the brightness computed by Lunar will get closer and closer to what you need.
Steps for finding the perfect brightness curve
- Reset the Algorithm curve on all displays from the Controls menu
- Whenever a display feels darker/brighter than it should be, use the menubar sliders to adjust it until it gets to the needed brightness
- In multi-monitor setups you can configure Lunar so that you can move the cursor to that display and use the brightness keys to control it
- Lunar will recompute the curve based on these manual adjustments so that it will be completely automatic after a few days
Sensor Mode
Use an Ambient Light Sensor to adapt your monitors.
On Apple Silicon, Lunar can detect and use the integrated ambient light sensors (ALS) of the MacBook, iMac and Apple displays, and use that to adapt any monitor's brightness.
On Intel and on devices without an ALS (e.g. Mac Mini, Mac Studio etc.) Lunar can also read the ambient light from an external sensor that can be connected wirelessly through the network.
To read about how you can make your own ambient light sensor for Lunar, check this page: DIY Ambient Light Sensor
If you already have a light sensor connected through something like Home Assistant or other home automation methods, you can use the lunarsensor server to link that with Lunar.
Curve Algorithm for Sensor Mode
This is the algorithm that converts the ambient light (in lux) to a brightness value specific to each monitor.
Lunar can learn from your personal light perception and readjust the curve whenever you manually change the brightness of an external monitor so that, over time, the brightness computed by Lunar will get closer and closer to what you need.
Steps for finding the perfect brightness curve
- Reset the Algorithm curve on all displays from the Controls menu
- Whenever a display feels darker/brighter than it should be, use the menubar sliders to adjust it until it gets to the needed brightness
- In multi-monitor setups you can configure Lunar so that you can move the cursor to that display and use the brightness keys to control it
- Lunar will recompute the curve based on these manual adjustments so that it will be completely automatic after a few days
Clock Mode
Adapt your monitor brightness and contrast based on a pre-defined schedule.
If you use your monitors in a shared office, or if you usually work on a well defined schedule, Clock Mode can be a good choice.
Schedule Types
Each schedule can be of the following types:
- Time: apply values at a specific time of day
- Sunrise: apply values when the sun starts to rise above the horizon
- Noon: apply values when the sun is at its highest point in the sky
- Sunset: apply values when the sun starts to fall below the horizon
Sunrise, sunset and noon
- The time for these types is computed daily
- The time can be offset using the hour/minute and sign values
- If the sign is
+the values will be applied after the sunset time - If the sign is
-the values will be applied before the sunset time
Schedule Transitions
- None: the brightness and contrast are applied at the exact time of the schedule
- 30 minutes: the brightness and contrast start transitioning 30 minutes before the schedule time, from your current brightness to the schedule brightness
- When the transition starts, the algorithm applies the computed values every 30 seconds so it doesn't allow for manual adjustments in the 30 minutes before the schedule
- Full: the brightness and contrast transition from schedule to schedule
- This transition applies the computed values every 30 seconds so it doesn't allow for manual adjustments
Events
The previous schedule values are re-applied when following events happen:
- Wake from sleep
- Display list changes (display connected/disconnected or enters standby)
- App is launched
To disable this event behaviour, uncheck Re-apply brightness on screen wake in Advanced settings
XDR Brightness
Increase brightness over 100% on XDR displays.
The 2021 MacBook Pro and the Pro Display XDR feature an incredibly bright panel (1600 nits!), but which is locked by macOS to a third of its potential (500 nits).
Lunar can remove the brightness lock and allow you to increase the brightness past that limit.
HDR monitors that have brighter than normal LED panels can also support this feature.
If you have a supported display, simply press the Brightness Up key on the keyboard to increase the brightness over 100% and XDR Brightness will automatically get activated.
You can also click on the XDR toggle in the menu bar to activate it, and on the SDR toggle to deactivate the feature:
XDR Selector

Brightness Keys
Auto XDR
Lunar can automatically toggle XDR based on the ambient light around you.
This option is especially useful when switching often between working outside and inside on your MacBook Pro.
The feature is available only in the following conditions:
- when using a 2021+ MacBook Pro
- when the MBP is used without a monitor
- when it has at least 20% battery
Enabling Auto XDR

Demonstration
Safety
XDR brightness is mostly safe. The MacBook and Pro Display XDR have been designed to sustain higher than 500nits of brightness.
- macOS has a hard limit on the LED temperature and it will start lowering brightness forcefully way before it can do any damage
- If used with mostly non-white backgrounds/apps, only the really close-to-white pixels will actually reach 1600 nits, while the rest will hover below 1000 nits, so they'll have plenty of time to cool down
While sifting through macOS internals, I've discovered a lot of logic for temperature thresholds, local dimming zones to keep pixels at their most efficient brightness, and safe measures for high power usage.
Based on the current knowledge, I'd say this is pretty safe to use, given that the system will not allow you to go past unsafe limits.
LED lifespan
Yes, the lifespan of the LEDs will be lowered if XDR Brightness is used daily, but no one can say by how much.
That's just how LEDs work.
Heat degrades the junction between the semiconductors, causing less of the electrical current to be converted to light which will make LEDs dimmer over time.
How are LEDs affected by heat?
macOS will stop XDR when the heat passes a threshold, but if you find that the warning icon (⚠️) appears often in the menu bar you might want to use XDR less often.
HDR monitors
Some HDR monitors have LED panels that support higher than normal brightness (usually higher than 600 nits).
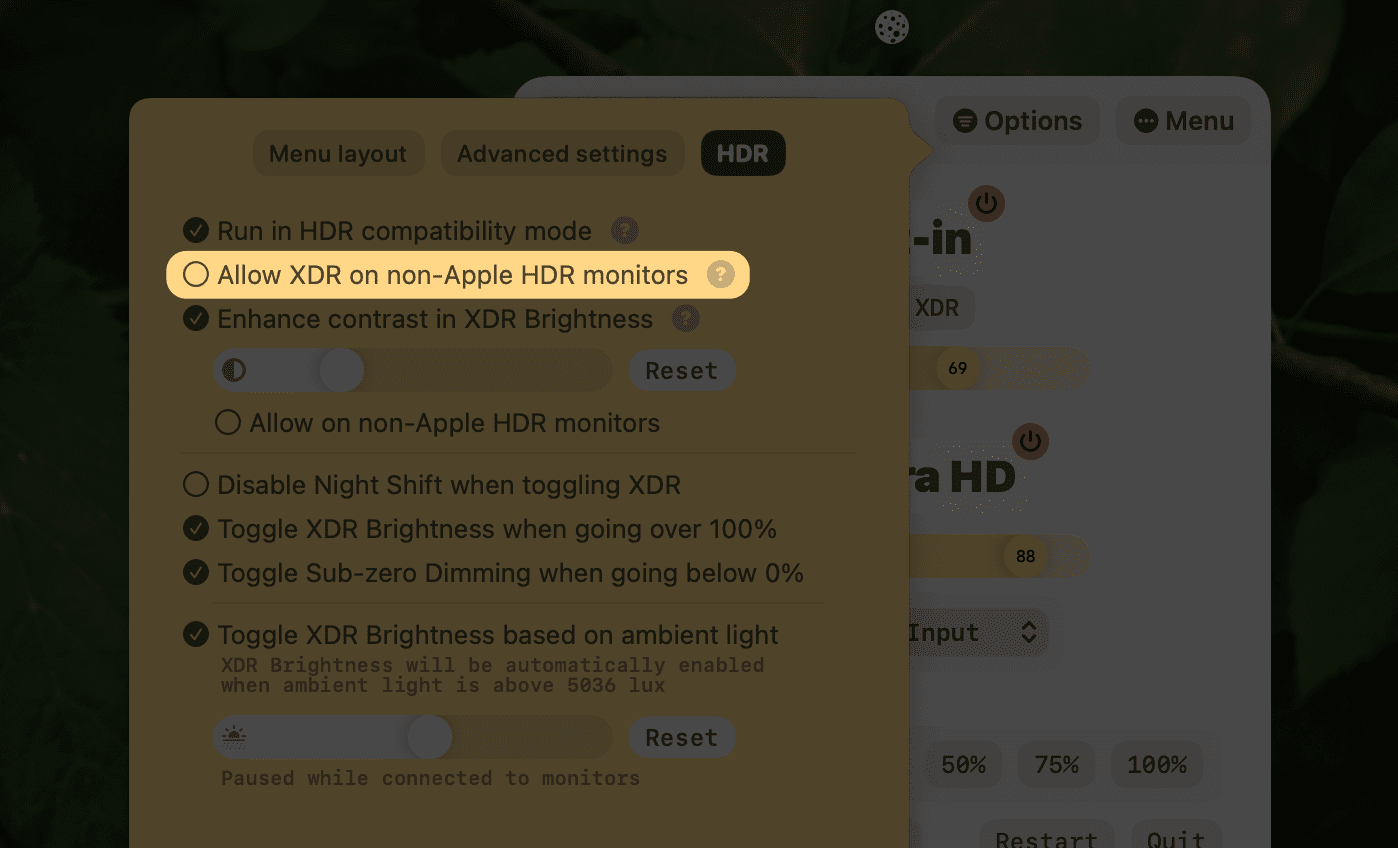
Lunar has an option to enable XDR Brightness on these monitors, but which is disabled by default because not all monitors cope well with this.
To enable it, open the HDR tab inside the Options menu and toggle the Allow XDR on non-Apple HDR monitors checkbox.
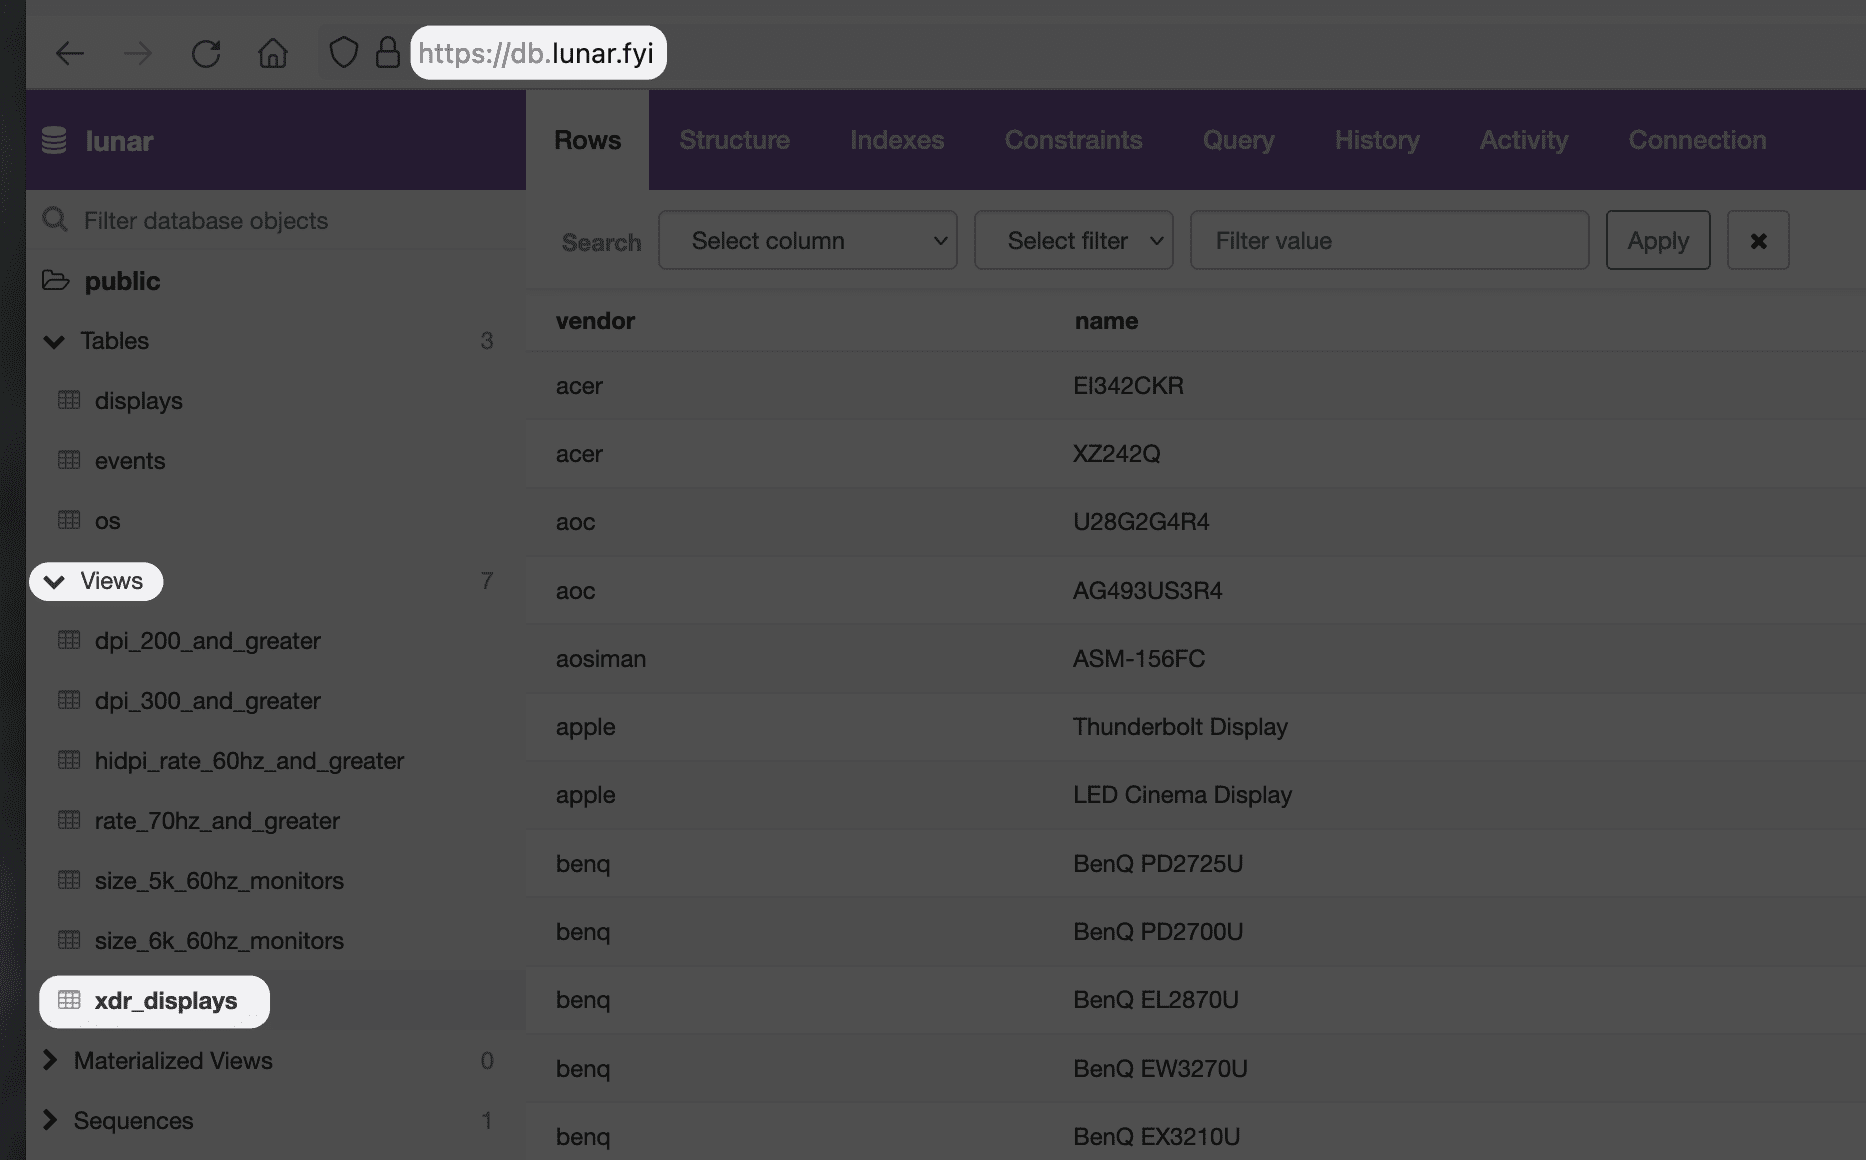
A list of monitors that might support this option can be found in the The Monitor Database under the xdr_displays view:
FaceLight
Light up your face in video calls.
How it works
FaceLight can turn your monitor into a really bright LED panel to light up your face when you're having video calls in a dark room.
The default hotkey for toggling FaceLight is Control+Command+5. You can also activate FaceLight from the Lunar menu.
- Simply move your cursor on the monitor you want to use as the light and press the hotkey to activate FaceLight
- Lunar will increase the active monitor's brightness and contrast to maximum and place a warm-white overlay on top of your screen
- Press the hotkey again to deactivate FaceLight and return to the previous brightness
BlackOut
Selectively turn off displays without disconnecting them.
Use cases
- Turn off the MacBook display without closing the lid
- Turn off external monitors while keeping the USB and charging capabilities
- BlackOut all displays except one so you can focus on it
How it works
- Move your cursor on the screen that you want to turn off
- Press the
Control+Command+6hotkey to activate BlackOut - Press the hotkey again to deactivate BlackOut and return to the previous brightness
The default hotkey for toggling BlackOut is Control+Command+6.
You can also activate BlackOut from the Lunar menu or by pressing the ⏻ Power button in the Preferences window.
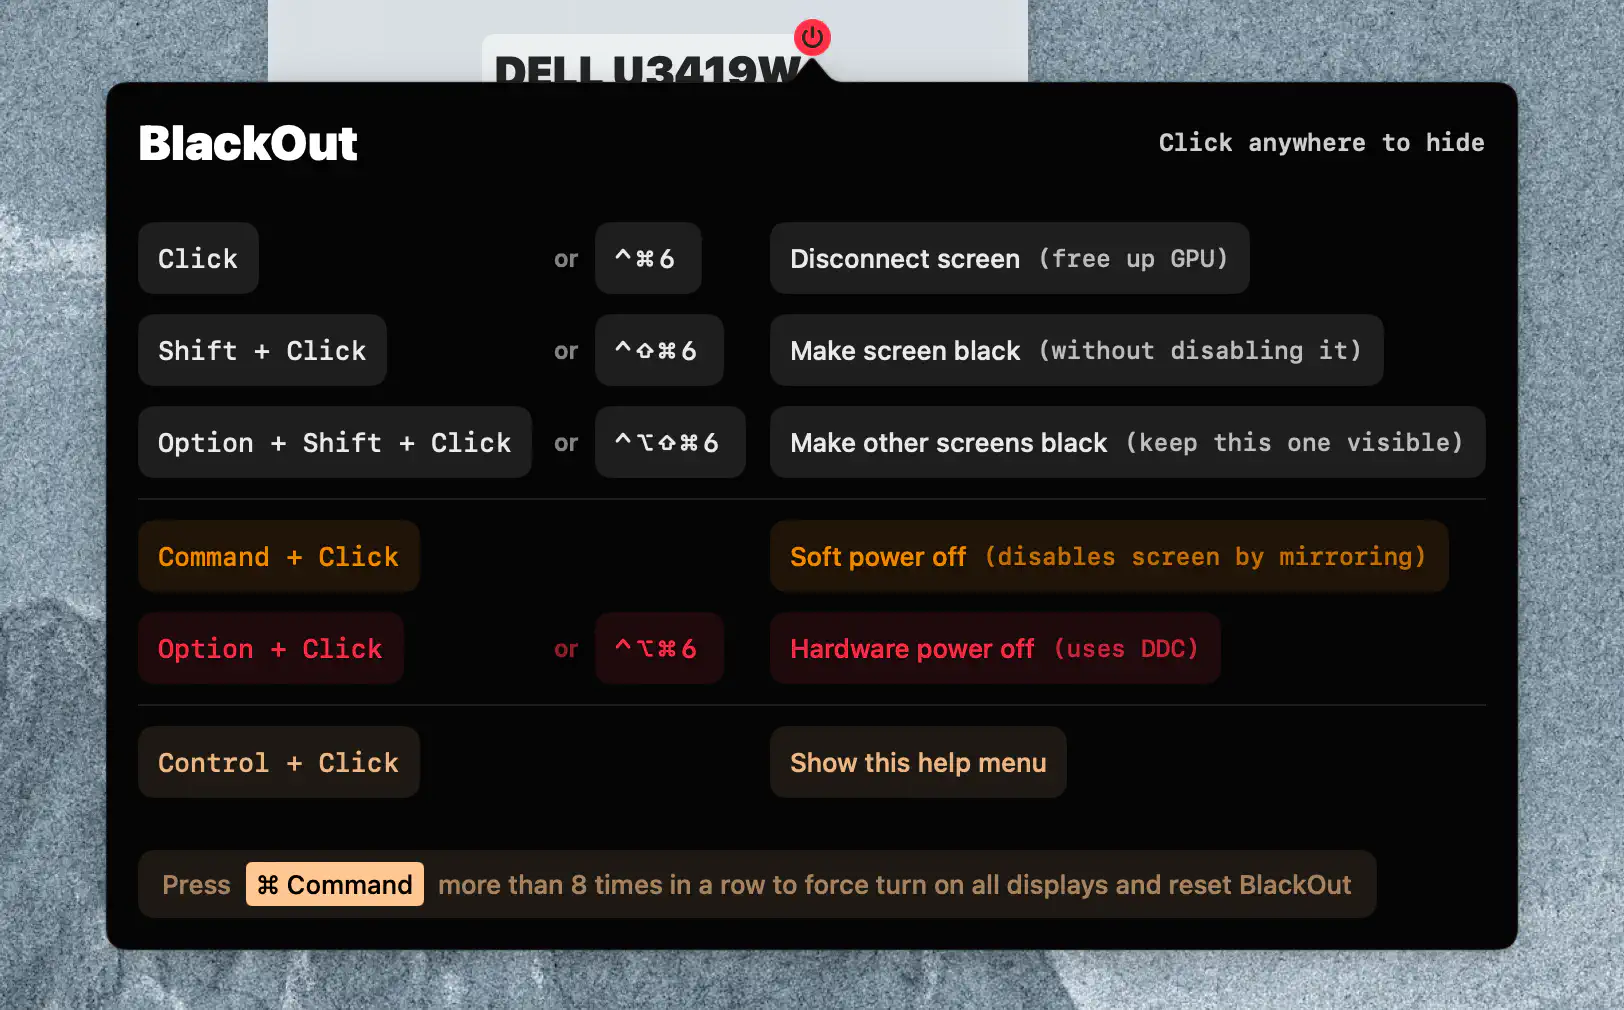
Modifiers
Hold the following keys while clicking the button (or while pressing the hotkey) to change BlackOut behaviour:
Shift: make the screen black without disconnecting itOption: turn off monitor completely using DDC (see caveats below)Option+Shift: BlackOut other monitors and keep the one with the cursor visible
The BlackOut hotkeys can be disabled from the Hotkeys page.
 (https://files.lunar.fyi/blackout-popover-help.png)
Caveats for DDC power off
- works only if the monitor can be controlled through DDC
- can't be used to power on the monitor
- when a monitor is turned off or in standby, it does not accept commands from a connected device
- remember to keep holding the Option key for 2 seconds after you pressed the button to account for possible DDC delays
Emergency Kill Switch: press the ⌘ Command key more than 8 times in a row to force disable BlackOut.
Unlimited manual adjustments
The free version of Lunar allows you to control the monitor's brightness, contrast, volume and switch inputs, using either hotkeys, Media Keys, UI or through the command line integrations.
The only difference with Pro here is that brightness and contrast adjustments have a limit of 100 adjustments per day.
An adjustment is counted towards the limit only after you have finished fiddling with the brightness/contrast value.
For example, the following actions will only count as 1 single adjustment:
- Press the
Brightness Upkey 3 times to get from 5% to 25% - After 5 seconds you notice that the brightness is a bit too high and press
Brightness Downone time to go to 20% - After another 5 seconds, you hover over the menu bar icon to open the
Quick Actionsmenu and scroll tofine tune the Contrastso that the whites aren't so jarring in your dark room - Finally, you press the
Brightness Upkey again as in lower contrast you need a bit more brightness for legible text
When you have done 100 adjustments in a day and the limit is reached, any new adjustment will show this dialog:
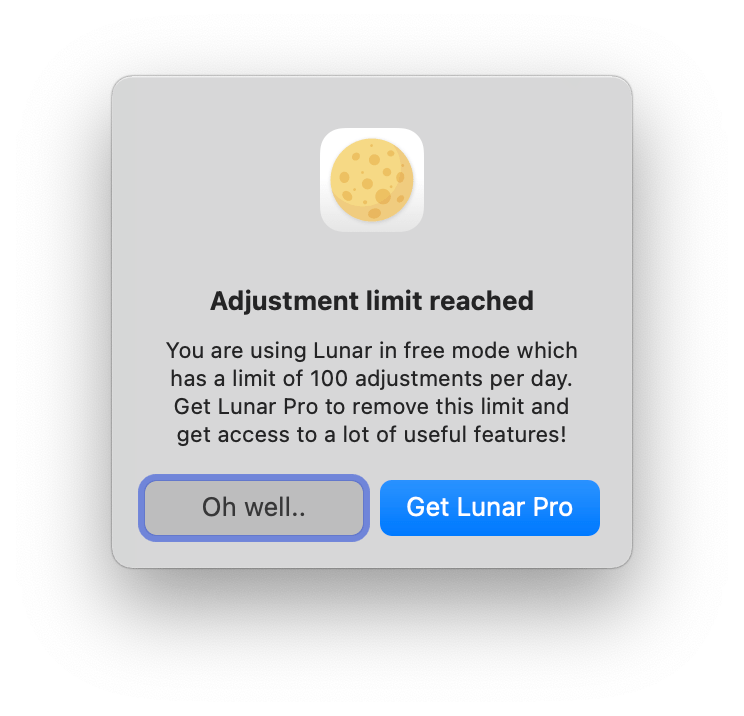
The Pro license lifts this limit and you can do as many adjustments as you want.